SpringMVC @RequestBody的使用
Spring mvc是一个非常轻量的mvc框架,注解可以大大减少配置,让请求的拦截变得比较简单。这次记录下@RequestBody 注解接收参数尤其是数组参数的用法。
关于容器的配置不再多说,这里写出spring-servlet.xml的sechme:
<?xml version="1.0" encoding="UTF-8" ?>
<beans xmlns="http://www.springframework.org/schema/beans"
 xmlns:xsi="http://www.w3.org/2001/XMLSchema-instance" xmlns:context="http://www.springframework.org/schema/context"
 xmlns:p="http://www.springframework.org/schema/p" xmlns:mvc="http://www.springframework.org/schema/mvc"
 xmlns:task="http://www.springframework.org/schema/task"
 xsi:schemaLocation="http://www.springframework.org/schema/context
          http://www.springframework.org/schema/context/spring-context-4.0.xsd
          http://www.springframework.org/schema/beans
          http://www.springframework.org/schema/beans/spring-beans-4.0.xsd
          http://www.springframework.org/schema/mvc
          http://www.springframework.org/schema/mvc/spring-mvc-4.0.xsd http://www.springframework.org/schema/task http://www.springframework.org/schema/task/spring-task-4.0.xsd">
          <!-- 扫描包注解 -->
 <context:component-scan base-package="xxxx"></context:component-scan>
 <!-- mvc注解功能启动 -->
 <mvc:annotation-driven />
</beans>
只要对应包名下面的添加注解即可扫描到对应的控制器,一般采用@Controller
RequestBody接收基本类型
@Controller
public class TestController {
// url请求拦截
@RequestMapping("test/test.do")
@ResponseBody // 返回参数为JSON
public void test(@RequestBody String name) {
System.out.println("getParams : " + name);
}
}
@RequestBody只要接收POST请求Body里的数据。

这样发送请求,即可在java控制台中打印:
getParams : {"name":"micro"}
@RequestBody接收基本数组
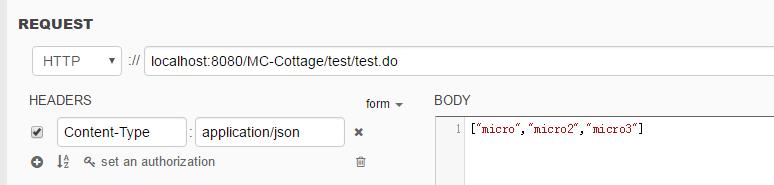
然后我们接收基本类型数组:
	@RequestMapping("test/test.do")
	@ResponseBody
	public void test(@RequestBody List<String> nameList) {
		System.out.println("getParams : " + nameList);
	}

这样即可获取到参数,不要body里写成了{“nameList”:[“name1”,“name2”]}这样会抛出异常。
@RequestBody是对应的POST请求的body,body即是获取的参数,如果想通过参数去获取,则要使用@RequestParams 注解:
	@RequestMapping("test/test.do")
	@ResponseBody
	public void test(@RequestParam("name") String name) {
		System.out.println("getParams : " + name);
	}

注意是GET请求,参数直接放到URL后面,这样就可以使用@RequestParams获取到对应参数名的参数值。如果是复杂的对象。
@RequestBody的使用。
定义model:
class Person {
	private Long id;
	private String name;
	// setter getter
}
@RequestBody接收复杂对象
接收参数的方式
@RequestMapping("test/test.do")
	@ResponseBody
	public void test(@RequestBody Person person) {
		System.out.println("getParams : " + person.getId() + " ," + person.getName());
	}
即可获取到参数,body里的参数会自动匹配到person的属性并赋值。
注意名字要与对象的属性变量名一致。否则获取不到参数,例如这里就不能在body里写成{“i”:1,“name”:“micro”},这样获取到person的id为null。
@RequestBody接收复杂对象数组
如果是复杂对象数组:
	@RequestMapping("test/test.do")
	@ResponseBody
	public void test(@RequestBody List<Person> personList) {
		for (Person p : personList) {
			System.out.println(p.getId() + " ," + p.getName());
		}
	}
请求方式如下,注意body里的格式是[]数组。

控制台打印:
1 ,micro
2 ,micro2
即完成了@RequestBody接收各种类型的参数。
@RequestBody使用的一些注意事项
众所周知,springmvc中@RequestBody的注解是一个很实用的功能,它能帮我们解析客户端(移动设备、浏览器等)发送过来的json数据,并封装到实体类中。
但我今天要说的不是它的原理,而是记录一些工作中使用@RequestBody注解遇到的一些问题,也提醒广大java开发者避免类似的问题。
最近有个需求,接收客户的设备发送过来的json数据,客户的设备里面只能修改ip,然后通过http协议的post方式发送数据过来。我很自然地想到在登录页那里处理,在toLogin方法中增加@RequestBody Kehu kehu参数,用户解析并封装json数据。
废话不多说,上代码,如下所示:
@RequestMapping(value = "/toLogin")
	public ModelAndView toLogin(HttpServletRequest request, @RequestBody Kehu kehu) throws Exception {
		// 接收客户设备发送过来的json数据
		if (kehu != null && !StringUtil.isEmpty(kehu.cmd)) {
			uploadData(kehu);
		}
		ModelAndView mv = new ModelAndView();
		PageData pageData = this.getPageData(request);
		pageData.put("SYSNAME", Tools.readTxtFile(Const.SYSNAME)); // 读取系统名称
		mv.setViewName("base/login");
		mv.addObject("pd", pageData);
		return mv;
	}
一切看似很完美,在浏览器上测试一下,输入localhost(我的项目已经设置为了缺省项目,端口号也改为了80)
我傻眼了,报了400错误。如下图所示:

The request sent by the client was syntactically incorrect.
翻译过来就是:客户端发送的请求在语法上是不正确的。
没加@RequestBody Kehu kehu之前是正常的,问题肯定出在了这里。我一看RequestBody的源码:
package org.springframework.web.bind.annotation;
import java.lang.annotation.Documented;
import java.lang.annotation.ElementType;
import java.lang.annotation.Retention;
import java.lang.annotation.RetentionPolicy;
import java.lang.annotation.Target;
import org.springframework.http.converter.HttpMessageConverter;

/**
 * Annotation indicating a method parameter should be bound to the body of the web request.
 * The body of the request is passed through an {@link HttpMessageConverter} to resolve the
 * method argument depending on the content type of the request. Optionally, automatic
 * validation can be applied by annotating the argument with {@code @Valid}.
 *
 * <p>Supported for annotated handler methods in Servlet environments.
 *
 * @author Arjen Poutsma
 * @since 3.0
 * @see RequestHeader
 * @see ResponseBody
 * @see org.springframework.web.servlet.mvc.method.annotation.RequestMappingHandlerAdapter
 * @see org.springframework.web.servlet.mvc.annotation.AnnotationMethodHandlerAdapter
 */
@Target(ElementType.PARAMETER)
@Retention(RetentionPolicy.RUNTIME)
@Documented
public @interface RequestBody {

	/**
	 * Whether body content is required.
	 * <p>Default is {@code true}, leading to an exception thrown in case
	 * there is no body content. Switch this to {@code false} if you prefer
	 * {@code null} to be passed when the body content is {@code null}.
	 * @since 3.2
	 */
	boolean required() default true;

}
required方法默认返回值是true。
这样问题就明朗了,我请求localhost的时候,没有传json过去,所以就会报400错误,因为客户端发送的请求在语法上是不正确的。
解决方法:在@RequestBody后面加上(required=false)就可以了。表示kehu对象可以不传入。
/**
	 * 访问登录页
	 * @RequestBody(required=false)	表示kehu对象可以不传入。
	 * 一定要加上required=false,否则登录的时候会报400错误。错误代码:
	 * The request sent by the client was syntactically incorrect.
	 * @return
	 * @throws Exception
	 */
	@RequestMapping(value = "/toLogin")
	public ModelAndView toLogin(HttpServletRequest request, @RequestBody(required=false) Kehu kehu) throws Exception {
		// 接收硬币机发送过来的json数据
		if (kehu != null && !StringUtil.isEmpty(kehu.cmd)) {
			uploadData(kehu);
		}
		ModelAndView mv = new ModelAndView();
		PageData pageData = this.getPageData(request);
		pageData.put("SYSNAME", Tools.readTxtFile(Const.SYSNAME)); // 读取系统名称
		mv.setViewName("base/login");
		mv.addObject("pd", pageData);
		return mv;
	}
以上为个人经验,希望能给大家一个参考,也希望大家多多支持猪先飞。
原文出处:https://blog.csdn.net/micro_hz/article/details/53157738